
Hey there! A couple of weeks ago when I went to Magnolia Market with my sister-in-law and cousin-in-law, we saw a lot of things we liked. One of those being a cute little bird nest. But I couldn’t bring myself to pay $20+ dollars for it. I told them we could make one ourselves and so we did. We made some of the cutest little bird nests you ever did see! And since it was so easy, I thought I’d show you how to make your own in 5 easy steps.
How to Make a Nest in 5 Easy Steps!
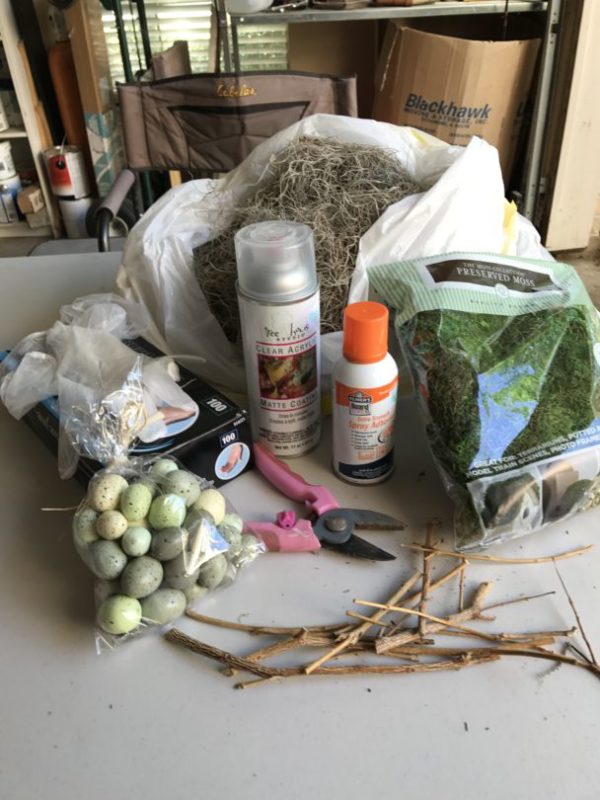
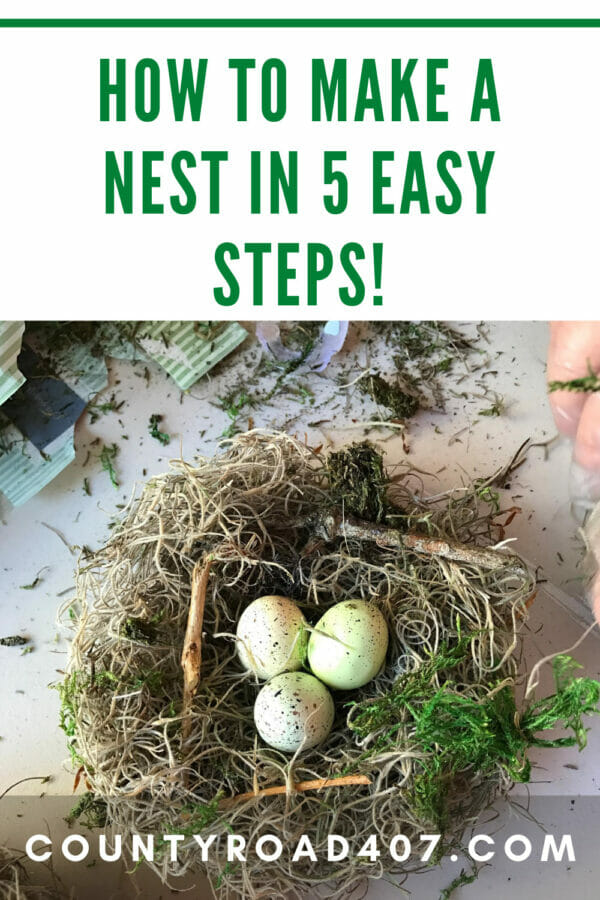
Supplies for making a nest:
- Spanish moss
- Preserved green moss (optional)
- Plastic eggs
- Twigs and/or boxwood stems (cut and gathered from yard)
- Gloves
- Spray adhesive
- Clear acrylic sealer
- Scissors or gardening shears
We gathered Spanish moss from the trees in Navasota but it can be purchased too. Or you could ask me to get you some. The Mister hates the stuff and would love to remove it from every tree in the yard but I have to put my foot down on that one. I love it.
You can get all of the supplies needed from Hobby Lobby or Amazon. I get the gloves at Sally’s Beauty Supply because I have to color my hair so often…but that is a totally different post my friends.
Step 1:
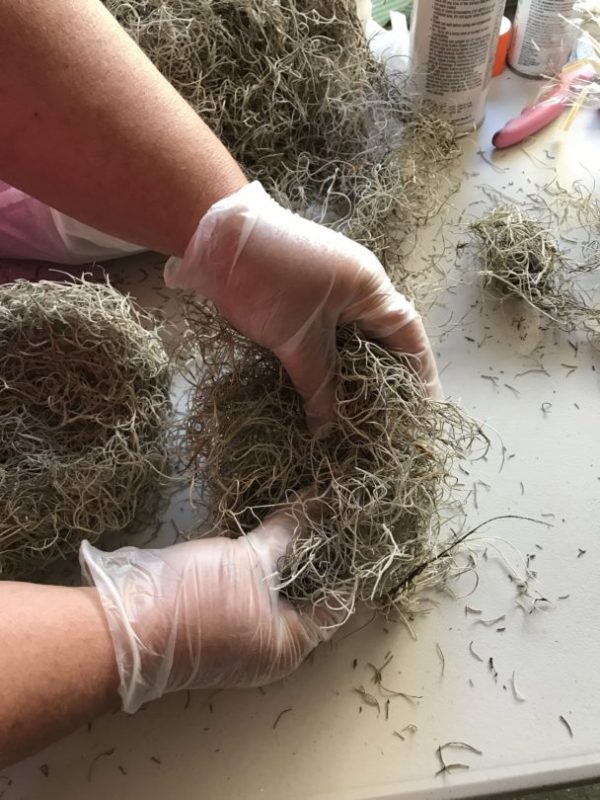
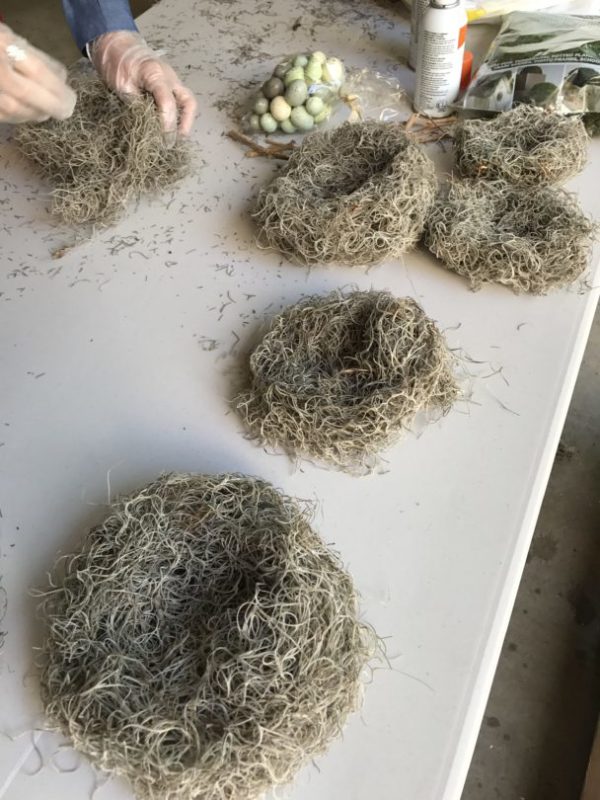
Put on your gloves! Not for safety but for stickiness. Then pull the moss out and decide what size you want your nest. A couple of large handfuls makes a nice sized nest. Start shaping the nest pushing down the middle with your thumbs.
Step 2:
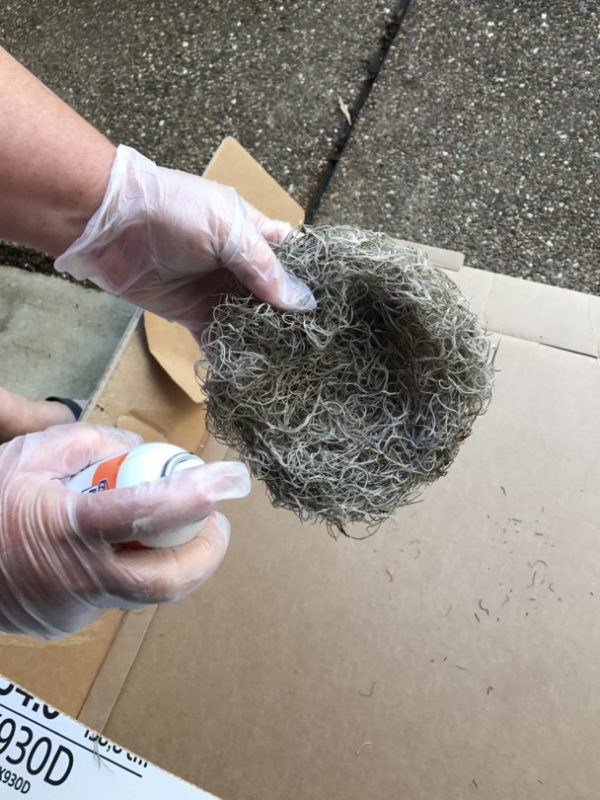
Spray the nest with the adhesive. This will quickly make your nest more malleable and you’ll notice that it’s where it starts to take its slightly permanent shape.
Step 3:
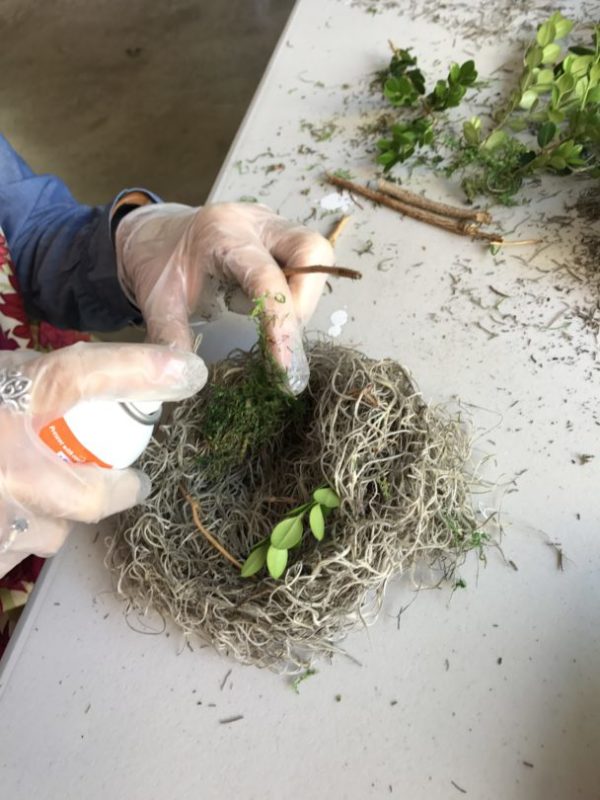
Decide what you want to add – twigs, boxwood stems, moss, etc. You can add all or some. Spray the extra pieces with the adhesive and place it where you want it. Consider how real birds make their nests. It’s not perfect nor is it symmetrical. Keep things random.
Step 4:
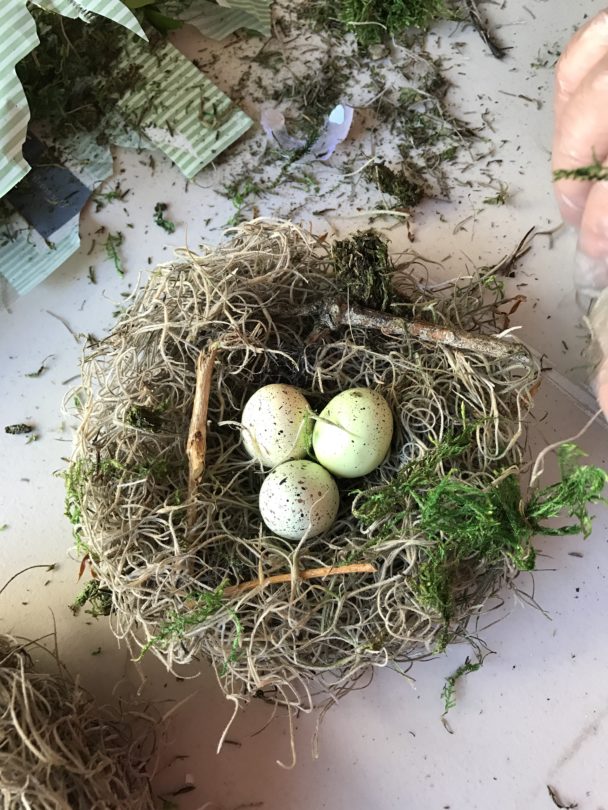
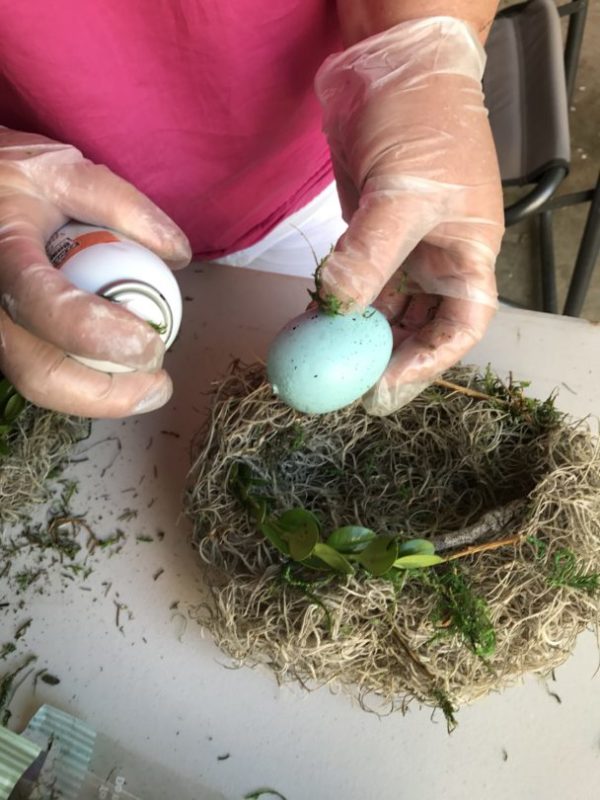
I placed the eggs where I thought they should go. When I thought it looked good, I picked up the egg and sprayed the nests and the bottom of the egg. Press it down and hold it for a few seconds. It sets quickly.
Step 5:
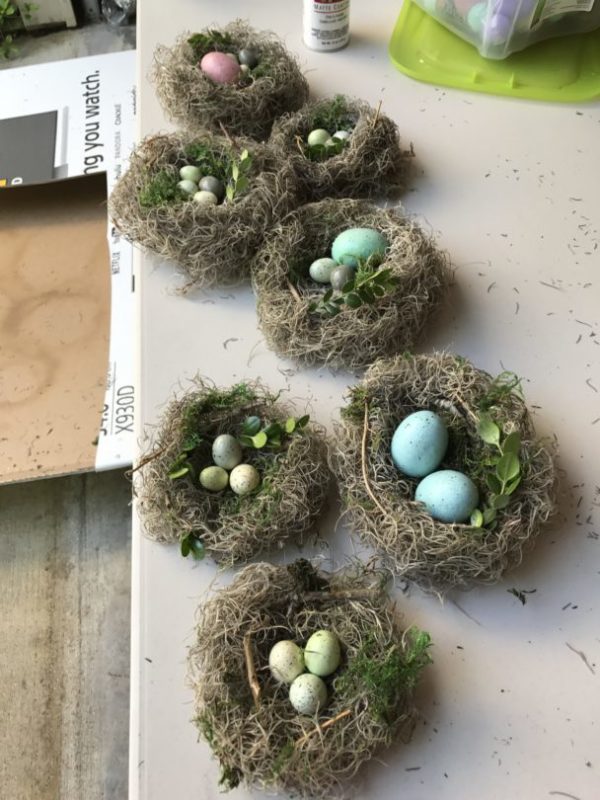
After we stepped back and admired our work, we sprayed the entire thing (bottom and top) with the Acrylic Sealer. This will keep it from falling apart and drying out.

That’s it – Voila – Finito!
You have made a really cute birds nest for Spring or Easter. I plan to place them all over the house. The supplies cost a total of $25 because some of the supplies were on sale or we used the Hobby Lobby 40% off coupon. The supplies listed above are mostly from Amazon for your convenience. We made 8 nests and had enough to make several more. Depending on the size, you could easily make 20+ nests with the supplies we had. I’d say that is a tremendous bargain compared to the nest at Magnolia Market.
And after you’ve made the first one, it will seriously take you about 5 minutes to make the rest. Super easy, super cute!
I just had a thought, you could put those adorable nests under a cloche. I made a cloche here if you’d like to check it out. Or you could add them to a wreath! That would be darling too. 🙂
Now go impress your friends and neighbors!

You’re so lucky to have access to the moss! I love it and am forever buying Spanish moss to top potted plants (inside and out)! Will buy some more to make nests, now! Thanks for the DIY!
Author
Thank you Karen! I can’t count how many times I’ve walked around yanking moss off the trees for a project. Many times it’s already on the ground or almost touching because it’s so long which is great news for this shorty. So glad you like the nest diy. It was fun to make. Have a great weekend!
Cindy, these are wonderful! I like them so much better made with moss rather than all sticks. And the natural elements you added make them even prettier! Brings back memories of playing with Spanish moss during my childhood days in Savannah…
Author
Oh wow, I think it would be so fun growing up in Savannah. The trees there are magnificent! Climbing them would have been an all day affair for my sister and me. Thanks for the visit Linda!
Thank you so much for sharing step by step. I made some this past week and love them! I use my nest for winter and spring decor. We live out on a wooded 10acre lot and always have birds so bird nests are now in my house(without the real bird mess, lol!)
Author
Oh my goodness Vickie – I am so excited to hear this! Thank you so much for letting me know you tried it. I’m smiling ear to ear! Hope they bring you joy for years to come. I still like mine and they’ve held up very well. Big hugs.
When you spray with adhesive aren’t they sticky?
Author
It is sticky at first. That’s why I recommend wearing gloves. When the spray dries though, it isn’t sticky. Hope that helps. 🙂
Did you use a flat acrylic sealer or gloss? Thank you for sharing this.
Author
Hi Susan, we used Matte Acrylic sealer on the nests. Hope you enjoy them around your home as much as I do!
Cannot wait to do this i have most of the supplies. Am making the eggs also. Great instructions and great project. Thanks
Author
You’re welcome Kim. It’s about time for me to get mine back out. 😃 Enjoy!
What is the spray adhesive you used on the nest, or where do you get it?
Author
It’s by Elmers. And i got it at Hobby Lobby. Hope you enjoy making them.
Love this diy for spring
Author
Thanks Amy! Easy peasy. Lemon squeezy!
Cute :))) I will use this inspitation:)))
Author
Glad you like them. Thanks for the visit today. 🙂
I have so much Spanish miss ha going from our trees. I’m going to make some of these. This is such a cute idea. I love how yours turned out.
Author
Yay Denise! I know I’m always excited to be able to use the Spanish Moss somehow so I bet you are too. Have fun making a nest or two or three! 🙂
I found a mattress and cut out all of the rusty springs out of it. I love little birds nests sitting on top of them and I refuse to pay retail for a nest. I have a craft booth and a craft fair coming up. Making the nests will allow me to pass on the low price for the decoration. Thank you for posting these instructions I plan to make several.
Author
Oh Lori, that makes my heart sing! I use my bedsprings for so many things and plopping a nest on it is an adorable idea. I am so surprised at how expensive a nest is in a store too so I know your customers will love your prices and creativity! Best wishes with your craft booth. I love craft fairs!
Thank you for sharing your idea. I couldn’t afford the nests so expensive. I just broke my hip and I’am recovering my surgery. This is such a great idea that you shared now I have something fun to make. It’s going in a wreath that I’am making for Easter wish me luck! Once again (Thank you )
Author
I’m sorry to hear about a broken hip but excited that you are feeling well enough to make one of these little nests. Putting it in a wreath sounds adorable! Enjoy and I hope you mend quickly Grace.
Beautiful nest. When you find you have too much moss send some my way. We don’t have the moss growing in Pennsylvania.
Author
Thanks Kimberly. If my hubs could figure out a way to make money from it he would. He hates the stuff!
You could form them around a metal ring, add a little hook to hang. They could be used in a garland, in a wreath on a wall etc etc.
Great, informative post! Thank you
Author
All great ideas Lori and thank you for the visit and comment! 🙂
Fabulous idea. I was told that in Florida we should bake them in a low 200 degree oven for 20 minutes to kill any tiny critters that might be in the moss. Kinda like drying acorns before you use them. Keep up the great work.
Thank you for the easy to follow steps. I have made a few decoupage eggs and these nests will put the finishing touch on my project!
Author
Aww, yay Sheila. I bet those eggs are beautiful! Enjoy making the nests and thank you for commenting.
Hi, I’m in Australia & have made these little nests for Easter. We have plenty of Spanish Moss in the garden. They look lovely ,I can’t wait for Easter now to use them.🐣
Author
Oh my goodness, how awesome! I’d love to see a photo. Thanks for letting me know. Happy Weekend!
Cindy, I would love to buy some moss from you. We do not have it growing on our trees in Kansas.
Author
Well I’m happy to send you some but if you have a craft store near you, they sell it as well. So does Amazon. Let me know what works best for you.
What kind of trees are you getting moss?
Author
From the Post Oaks. 🙂
Is this something my 8-12 year old class could do?
Thanks for your advice.
Author
I absolutely think an 8-12 yr. old could do this. They should also enjoy rounding up the natural foliage to put in the nest as well. Best wishes!
Thank u!